Inserting images#
Quick Reminder#
- Position the text cursor where you wish the top of the image to line up.
- Click on the
 Insert Media icon in the toolbar.
 - Click

- Choose the images to upload
- Click

Inserting an image#
- Position the text cursor where you wish to insert the top of the image. To keep things tidy it's usually best if you place it on it's own line, or at the very start of a paragraph.
- Click on the Insert Media icon in the toolbar.
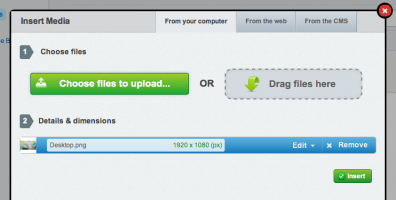
- Click on the button. You can also drag & drop files from your computer onto the marked area (not available in all browsers).
- Locate the image(s) you'd like to insert, and click on the Open or Choose button.
- The image(s) shall then upload.
- Once they have uploaded click on the button.
- You can then drag the little drag handles on the image to resize it to your required size.
[note] Image files for a website must be in either JPG, GIF or PNG format. If your image currently exists in a Word or Publisher file, you must first save the image as one of these file types, usually by right clicking on it, and selecting Save as Picture... [/note]
[note] If you are using Internet Explorer, you should only select 1 image to insert at a time. Also Internet Explorer isn't able to resize images while keeping it's proportions, so you may wish to use another browser such as Google Chrome or Mozilla FireFox, or use the Edit interface (see below) to manually enter it's size. [/note]
Setting the alignment of an image#
- After the images have uploaded in step 5 above, click on the
 link next to an image.
 - You can then choose from various alignments in the Alignment / style dropdown.
- Click as normal, to insert the image
Changing the alignment of an image that's already been inserted#
To change the alignment of an image that you have already inserted into a page:
- Click on the image in the Content box to select it, little square drag handles should appear on the image.
- Click on the Insert Media icon.
- A box will open allowing you to change the alignment settings of the image.
- Click

Repositioning an Image#
To change the position of an image that you have already inserted, simply click and drag it, moving the text cursor to the position you'd to move the image to. Then release the mouse button. Remember, the text cursor position only defines the position of the top of the image, so you're best dragging it to the very start of a paragraph, or onto it's own line. To change the left/right alignment of the image, see above.